Studio exploration 4 : Photoshop
- Apr 23, 2025
- 4 min read
So why Adobe Photoshop?
Well it is the mainstream industry software, used by almost every current working professionals on games, movies, comic, etc. While many apps out there have tried to mimic and include the features that Photoshop has, they are still imitations, lacking quite a lot of accessibility and creator supported features.
However, one thing to note is that Photoshop can be quite expensive, being charged monthly for the price of $22.99/month. Often time, schools provide discounts or even free subscription, however, it is still a note worthy price tag. Plus, a drawing tablet is also needed for maximum efficiency with the software, which can range from $70 to $2000. (I myself have used the $70 ones for many years, and I recommend every beginner to start with them.)
This studio exploration's goal is to not only inspect Photoshop, but also provide a step by step usage to create an artwork on the software.
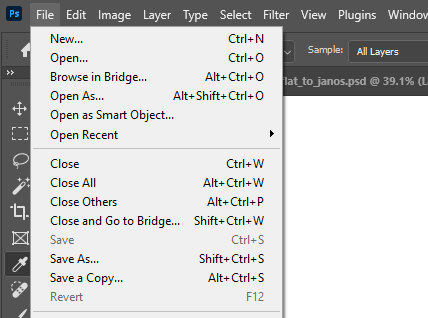
User Interface.
This is the standard screen once Photoshop is opened, perhaps with less "windows/menu" which can be turn on in the Window tab on top

Figure 1. standard new file 
windows and other menu options

Some of the other important menus in Photoshop are the Tools Bar on the left. If I hover my mouse over the tools without clicking, the AI assisted menu will pops up with a quick video to explain how each tool is used.
These tools include all the basic necessities such as Brush, Eraser, Selection Tool, Move Tool, etc
The next thing we should pay attention to is a small menu at the bottom right of the screen, which is meant to help people control the different layers in the app, either to create new, create a mask, delete or color grading.
The most important thing to look at are the 2 right most icons on the bar. Trash bin for deleting a layer and plus in a square for creating a new layer


The layers are how artist can control what they are drawing. Think of them as visible planes of papers, with the top layer being the most recent one.
Some other menus that are important can be seen such as Color, Brushes and Navigator (An overview of the artwork). Which can be seen in Figure 1 up top.
The last menu that is very important for beginner is the File pop down menu, which is used to create a new art work, or to save the current work, either as a new file form or a work in progress.
File menu Starting the art work
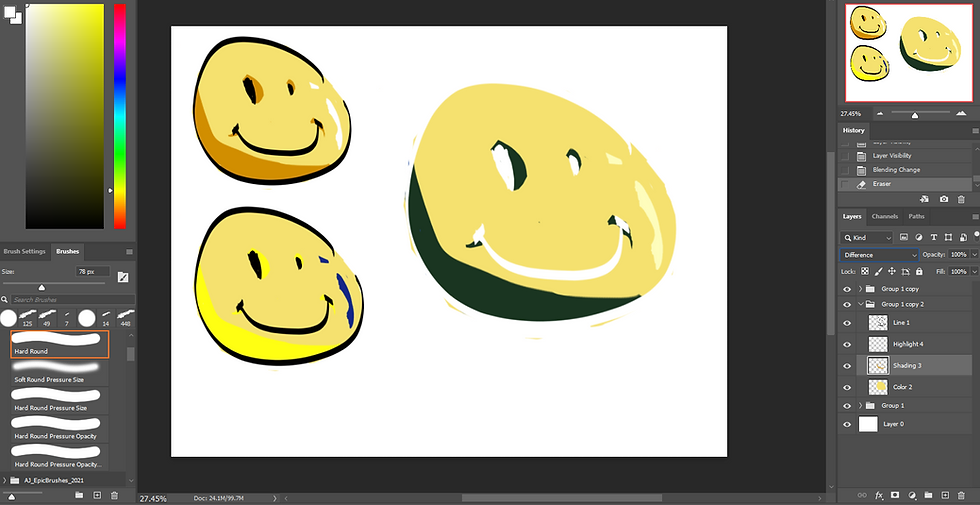
1. Create a new layer on top of the Background, this step is very important as the Background layer will act as a paper surface, helping students draw and erase things easier.
2. Choose a brush and color. Then draw on the new layer.

3. Then, try creating another layer, but moving it under layer 1. Student can also rename the layers by double clicking their names.
4. Pick another color and fill in the drawing above using the brush tool, in the new layer.

5. Now comes, create another layer and choose a different color to provide a more varied drawing, be it shading or a new feature. Here, I will do shading. Student can also create another layer for highlight if they want to.
Not to keep the 2 layers separated.

layers name and orientation can be seen on the right side 6. Now, we will do some amazing thing with Photoshop and show off the power of a digital art software.
7. On the Layers window, where the word "normal" is currently selected, play around and change it to different settings to show different presentation.

Here it is :D 8. Next, select layer 1 through 4 (excluding the background layer) and right click, select new group from layers.
9. After that, after naming that group to anything you want, right click it again to select duplicate group.
10. After this, you can click on any of the group and hit Ctrl + T, meaning while holding Ctrl, click T. Then, you can click and move the image, even changing the size and other settings by right clicking it. After you are done, simply hit Ctrl + D to deselect.
11. Now, you can have as many version of your drawing as you want to play with, then choose a final one that you like.
Variations can be done sooo much faster now 12. Very importantly now, you can go up to the file pop down menu and hit Save As, then choose any folder or desktop. Somewhere that is easy for you to find. We do not want to lose our hard earned work so far.

13. Now, feel free to mess around with other tools, and as long as you do not click save, none of that work will affect the already made drawing. Of course, the same goes for the opposite, any noteworthy changes needs to be "SAVE" before closing the file.
Some of the other important Short Key
B - Brush
E - Eraser
L - Lasso tool
I - Eye Picker tool
V - Move
H - Hand
Ctrl + Z for Undo
Ctrl + S for Save
Ctrl + D for Deselect
Ctrl + T for Transform
Ctrl + J for Duplicate
Ctrl + U for color manipulation/ Hue and Saturation Slider
Age Appropriation
Many might think that the software seems complicated and children will have a hard time to maneuver the control, I, however, have got to seen first hand how easily children can navigate and get used to the software at a very fast pace. Perhaps the theory of children adjusting to new languages can be applied here, as they learn and remember new tools very fast. Personally, I also think the software can be learned at all ages to do many things, not just painting, like photo manipulation and animation. The possibilities are endless, with the only barrier of entry being how many hours you are willing to put into learning it.
Personal Examples of Final Works:


Comments